Showing posts with label ring a week challenge. Show all posts

Friday, August 5, 2011

New challenge...Project Runway Challenge Season 9 - week 1 (RAW 17)

As if the RAW (ring a week) challenge wasn't enough for me to handle.... which by the way every day life has made me fall slightly behind in that challenge.... I have decided to participate in the Etsy Metal Project Runway Challenge as well. How it works is we watch Project Runway, which airs every Thursday night, and then their challenge is translated into a jewelry challenge which is due the following Thursday night. This week the designers had to use the clothes they slept in the night before plus one of their bed sheets to create a new look. Taking something old and making it into something new. They also had access to dye and trimmings. This translated into a jewelry challenge is to make something only from scrap material that is sitting on your bench. Since the designers got a sheet, we get to use some extra sheet metal. We also can add stones from our supplies since they got use dyes and trimmings. I found an old ring band from a ring I took apart last week, a piece of scrap wire and a piece of scrap silver sheet left over from another project.
 

I cut the ring band down and made it thinner. I also added some texture to it. I used the wire to make the "stilts" and the scrap sheet became the top piece of the ring. The only other things I added was another small piece of silver sheet and a stone and this is what I came up with....


I am hoping to be able to combine some of my RAW and Project Runway pieces so I can get caught up on RAW and participate in Project Runway challenge as well.This is one of those pieces...So far so good!

You can see some of the other Etsy Metal members Project Runway Challenge pieces here.

Friday, April 15, 2011

RAW 14 & 15 (ring a week)

I do not seem to have a problem making my RAW rings, it's posting the photos/info of them is where I start slacking off! So here’s one post with my last 2 weeks of rings…..and don't forget to check out the rest of groups RAW rings too!
My RAW 14 ring was a custom order from a woman for her boyfriend. She wanted me to make a ring exactly like he had only in silver so it wouldn't turn his finger green like the base metal one he owned did. It is a cold connected ring. A piece of silver has been wrapped over itself a few times and then riveted. I have riveted many times before just not on a ring. It wasn’t as hard as I thought it would be.


My RAW 15 ring is something I have never done before either. I really like the more 3D rings I have made for this challenge and my “flat” rings just aren’t doing it for me anymore. I wanted to make this a hollow form ring but due to the price of silver being over $40 an ounce I decided to challenge myself and try to come up with a way to raise the stone but also use less metal. This is what I came up with. The stone is called Royal Savannah Jasper. I liked the way the stone was divided down the center so I decided to follow that line and divide the metal as well. Half of the silver is textured and half is not. The way I raised the stone is to put the piece on “stilts”. I cut little pieces of wire and soldered them onto the base and then attached the top to that. It used less silver than if I was to create a hollow form. I am pretty pleased with the outcome. J


Wednesday, March 30, 2011

Killing 2 birds with 1 stone....

EtsyMetal Monthly Challenge & RAW #13 (ring a week)
I am finally caught up on my postings of my RAW rings so this post is right on time! This week's RAW ring actually had a theme "kinetics". It just so happened that the EtsyMetal monthly challenge that is due March 31 is also the same theme so this ring does double duty! The "Rattle Ring" is made from sterling silver and filled with little stones inside made of glass. I then topped the whole thing off with a piece of acrylic to hold the stones in. Since the stones are not set in a setting they are free to move around inside the ring...hence the kinetic part! It also makes a great little rattling sound when you shake it. The stones are very small (3mm) so it was hard to capture the movement in the video below but I think you get the idea! You can see all the RAW Theme Challenge rings in a new Flickr group set up just for these challenges. I can't wait to get working on my next theme ring!


Monday, March 28, 2011

RAW #11 (ring a week)

I am a little behind in my RAW postings so I hope to get all caught up by the end of this week. My RAW 11 ring was inspired by some mixed metal cuffs that I made a few weeks ago. I am really enjoying working more and more with adding texture to mixed metals. This ring band was made with brass, copper and sterling silver. Each metal was given a different texture and the combination of all three seem to work quite well together. Below are images of the ring along with a photo of the bracelet that was the inspiration.


Thursday, March 17, 2011

RAW #10 (ring of the week)

I am a little behind in posting due to the fact that I was out of town last week so I am hoping to get caught up soon! My week 10 ring was inspired by something I saw at the Philadelphia Flower Show last weekend. I now wish I had taken a photo of it but of course I did not...It was a table set for dinner. The table and chairs were draped in a lush dark gray fabric and and all the color came from the flowers and dishes which were a bright pink color. The colors stuck in my head so I decided to pick the same colors for my RAW ring! This ring is set with hematite and tourmaline. This ring is available for sale here in my Etsy shop.

Sunday, March 6, 2011

RAW #9 (ring of the week)

I didn't really have much time this week to make anything totally fabulous for my week 9 RAW ring. Last week (week 8) I made the Ravioli Ring and I also made a set of mixed metal stackable rings. I listed them on etsy and got a lot of attention from Facebook friends and then decided I really liked them for myself. So this week I make another set to keep for myself and even though they are not what I had planned for my RAW ring, they do technically qualify as "rings made this week". So here they are:

These stackable rings have even inspired some new earrings and necklaces so all in all even though my week 9 RAW ring is not as challenging to me as some of the others I have made, it has not been that bad of a week! :)


necklace inspired by stackable rings


sterling earrings inspired by sterling stackable ring


copper and sterling earrings inspired by stackable rings


brass and sterling earrings inspired by stackable rings

Saturday, February 26, 2011

RAW # 8 (ring of the week)

Plan A for this week's ring didn't actually work out so well as a ring so I had to go with Plan B.


Plan A was to make something like this:

While I can totally understand this drawing, you probably have no clue what it means so let me explain....The center teardrop is a stone. It has four little wires or "legs" coming off of it with little circles at the end (more stones). The "legs" are attached to another teardrop made of wire that the little stones sit on. When finished it will look kind of like the large stone is suspended inside the wire teardrop. It came together perfectly but before putting on the band it started to look more and more like a pendant to me. It took me about a half an hour of going back and forth between a ring and a pendant before I finally made the call. Looking at the photo below you can see what I decided.


So then I needed to go to Plan B.... I have been playing around with some new die shapes I have made for my hydraulic press. Since I had a bunch of copper pieces laying around on my bench that I used to test out my dies, I figured that would be a good place to start. This is what I came up with:

It kind of reminds me of a ravioli...hhmmm...I think I just found it's name :)

Monday, February 21, 2011

my inspiration for participating in "RAW"

Some of the artists participating in the "RAW (ring a week) challenge" (including me) have decided to do a blog carnival. A blog carnival is where a group of people pick a subject, blog about it then post it with links to all the other blogs that are participating.

The subject of this blog carnival is "What was your inspiration for participating in RAW?"

My inspiration for participating in the RAW challenge was actually the "RAD" (ring a day) challenge. The challenge was to make a ring a day every day for the year 2010 ending up with 365 rings by Dec 31. I came across this challenge by accident while surfing the web. I thought this was the greatest idea and would have loved to participate but I didn't find out about the challenge until day 115 so I would have been quite a bit behind. I would check in on the challenge every so often to see what was new. There were some really great rings that have been made. On Jan 5, 2011 I checked in on RAD to see all the completed work for the year and that's when I saw the post about a new challenge for 2011. There was still a couple days left in the first week of January so I decided to jump in! I am such a ring person. I love making and wearing them, and the bigger the better if you ask me! I also have been in a creative funk lately so I thought this would be a great way to challenge myself and get the creative juices flowing. I figured I could use techniques that I don't get to use very often and maybe teach myself a thing or two along the way.

So far I LOVE it! I am 7 rings in and have used 3 of the many techniques I plan to incorporate into my RAW rings. I want to give my RAW rings lots of dimension and texture so I have made hollow forms, I hand carved carved ebony and I have incorporated hinges into my pieces. I have even made my more simpler rings more interesting than I have in the past by adding curves and texture to them and I am very pleased with the look of them. I would like to try to combine some of the harder techniques I haven't used yet and possibly use them in 1 ring. It will either turn out awesome or end up in the scrap box but I won't know unless I try! So keep an eye out for my future RAW rings!

To read more about other artists inspiration for participating check out the blogs below!

Marcie Abney - http://www.labellajoya.blogspot.com/

Joanne Harrill - http://www.jojobell.com/

Thomasin Durgin - http://www.metalriot.blogspot.com/

Amy Nicole - http://www.rubymtnbeads.blogspot.com/

Janice - http://www.doxallodesigns.blogspot.com/

Aleksandra Micic - http://www.micicart.blogspot.com/

Lana Chu - http://www.ginkgoglass.wordpress.com/

Evelyn Markasky - http://www.markasky.blogspot.com/

Kerry Alice-Twigs and Heather - http://www.twigsandheather.blogspot.com/

Lorena Angulo- www.blog.lorenaangulo.com/

Kate Jones-- http://www.katejonesdesign.blogspot.com/

Maria Apostolou- www.createjewelry.gr/blog

Sarah Small - http://www.bysalla.blogspot.com/

Rebecca Bogan - www.Adobesol.com/blog

Elaine Luther - www.CreativeTextureTools.com/news

Rebekah Timlin Meddles - http://www.lunasadesigns.blogspot.com/

Laura M (Zoeowyn)- www.zoeowyn.blogspot.com/

Kimberly (bahamadawn) - http://www.bahamadawn.blogspot.com/

Erin Austin - http://www.metalmusing.blogspot.com/

Catherine Witherell - http://www.happydayart.typepad.com/

Joan Furilla - www.jfurilla.wordpress.com/

Kathryn Cole- http://www.kathryncolejewelry.blogspot.com/

Thursday, February 17, 2011

RAW #7 (ring a week)

Better late than never is what I always say! This week's ring isn't as involved as my last one but I am running out of time in the week and wanted to get a ring in today so I can keep on schedule. I didn't really have an idea for my ring ( I've been really busy with other stuff and haven't had time to think about it) so I looked through my stash of stones and found this Plume Agate that I have had for quite a while....years actually....So I pulled it out and before you know it it became a ring!

Tuesday, February 8, 2011

RAW # 6 (ring a week)

Well, I finally did it! I finally made a ring that opens. I have always wanted to make a container type ring but never really had the time or should I say I never really gave myself the time to do so. By committing to participate in RAW the year I have had to force myself to set aside time each week to work on my projects. So here we are 6 weeks into RAW and I finally had a plan as to how I was going to make the ring. The shape actually came to me while watching the "Super Bowl" on Sunday night. That being said, I'm sure you can guess what the shape is before even looking at the photos below! The ring is made from sterling silver and set with an iolite stone. It has been roll printed, hydraulic pressed, soldered and oxidized before the stone was bezel set.

Wednesday, February 2, 2011

RAW #5 (Ring a Week)

This week for my RAW challenge ring I wanted to make a container ring (also called a poison ring). I knew I wanted to make a ring that opened but due to my busy schedule and lack of ideas for what the ring should look like, I decided that I would keep it simple this week. I ended up messing around in the studio and came up with these "saucer rings" instead. Each one has been textured via the rolling mill and then shaped with a slight curve or dome giving them their saucer shape. Each ring is finished by setting them with 3 semi precious stones. I am pretty happy with the design and probably will tweak them a bit and then add them to my production line.

the rings are set with lapis, peridot and amythyst stones

Tuesday, January 25, 2011

RAW #4 (Ring a Week)

For my 4th ring in the Ring a Week (RAW) Challenge I decided to try something I haven't done before. I wanted to carve a ring out of a piece of ebony (wood) and then add some silver detail to it some how. It has been quite a while since I worked with ebony and even back when I did I never made a ring before. I wasn't sure what the piece was going to look like when I started the project but I thought it would be a good learning experience for me. So here's how it went :)

I started by cutting a small chunk off the block of ebony that I had.


I used a drill press to make a hole in the ring and then started to file the ring into the correct size to fit my finger.

Finally it fit. YAY!

Then I just started filing and sanding until I had a shape that I liked.

Once I figured out where I was going to add the silver, I carved a groove a little off center on the top of the ring.

Then I inserted the oxidized silver piece and polished up the ebony to bring out the rich dark color of the wood. All finished!
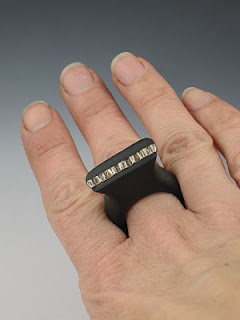
And here is the finished product next to the chunk of wood it was originally cut from. It took me about 4 hours (give or take) and the entire ring was done with hand tools, except for the drilling of the hole. It was fun to make and I definitely learned a few things for next time! Well worth the time and effort spent!

Related Posts Plugin for WordPress, Blogger...